Design Software
In order to print an object on your 3D printer you will need to create a 3D model. It is important if you are going to have students create 3D models (and in most cases several iterations of them) that you learn the basics of the software in order to support the students conceptual understanding, and to realize the time affordances that students will need to successfully complete their challenge.
Computer Aided Design or CAD software is used to create a 3D model that is saved as an .STL (or .OBJ) file which will eventually be printed on a 3D printer. There are many CAD software choices to choose from and one might even be packaged along with your 3D printer. The following are a few examples of software that are commonly used in an educational setting. From a beginners perspective we recommend that you start with TinkerCAD, and as you get more familiar with the concepts of 3D design graduate up to a more advanced software package like Google SketchUp, Blender or AutoCAD.
Computer Aided Design or CAD software is used to create a 3D model that is saved as an .STL (or .OBJ) file which will eventually be printed on a 3D printer. There are many CAD software choices to choose from and one might even be packaged along with your 3D printer. The following are a few examples of software that are commonly used in an educational setting. From a beginners perspective we recommend that you start with TinkerCAD, and as you get more familiar with the concepts of 3D design graduate up to a more advanced software package like Google SketchUp, Blender or AutoCAD.

Screen capture from TinkerCad.com
Here are three examples of design software you can use to create a 3D model.
Beginners
|
|
Slicing Software
After creating a 3D model in a CAD software such as TinkerCAD the model will need to be saved in a .STL or .OBJ file format and loaded into a slicer software.
Slicing software renders your 3D model into a file that is recognized by your specific printer. It literally, in a digital context, slices your 3D model into very thin layers that your 3D printer will eventually print. Included in the rendering are important settings that the printer will need in order to print successfully. Some examples of the settings that the printer will need and the user has control over are:
There are many more variables to choose from in a slicer software that affects the print quality, speed and overall success for printing your 3D model. From a beginner's perspective we recommend you start with the default settings and only make minor tweaks until you are more familiar with the software; too much fine tuning may work against you when troubleshooting an issue with printing.
Slicing software renders your 3D model into a file that is recognized by your specific printer. It literally, in a digital context, slices your 3D model into very thin layers that your 3D printer will eventually print. Included in the rendering are important settings that the printer will need in order to print successfully. Some examples of the settings that the printer will need and the user has control over are:
- Print Quality (Layer Height)
- Infill Density (Hollow or Solid)
- Print Material (Extruder Temperature)
- Print Speed (Time it takes to print)
- Support Structures / Rafts (better adhesion overhang support)
There are many more variables to choose from in a slicer software that affects the print quality, speed and overall success for printing your 3D model. From a beginner's perspective we recommend you start with the default settings and only make minor tweaks until you are more familiar with the software; too much fine tuning may work against you when troubleshooting an issue with printing.

Screen capture from Cura software.
There are many different slicer programs to choose from but most 3D printers come packaged with a slicer which is usually optimized for that printer. For instance, if you had an Ultimaker printer you would use Cura; if you had a Prusa printer you would use Slic3r. Either way, we recommend that you start by using the slicer program that comes with your printer.
Important Slicing Settings
Print Quality (Layer Height) |
Infill Density |
|
Most printers bought after 2014 can print reliably between 100 and 300 microns or 0.1 to 0.3. Typically, most presets will set the initial print layer to 0.15 for better plate adhesion; for finer detailed items you might print at 0.1 to 0.15. However, if you print below 0.2 the print will take longer and you'd better have a level bed.
Teacher Tip: We found that the optimized presets work fairly well and we've had the most success with presets optimized for 0.2mm resolution (or layer height).
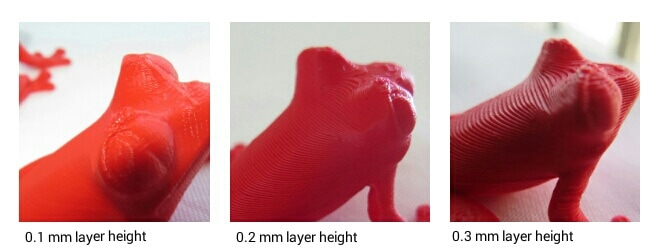
Image retrieved from: https://3dprintingindustry.com/news/ulio-3d-the-3d-printer-almost-completely-made-out-of-3d-printed-parts-75772/
Extruder TemperatureFilament suppliers usually give a temperature range for their filament, and there always seems to be a sweet spot for each filament. We recommend you research your filament settings and adjust your slicer settings accordingly. Most PLA filaments print best inside the range of 200 to 250 degrees
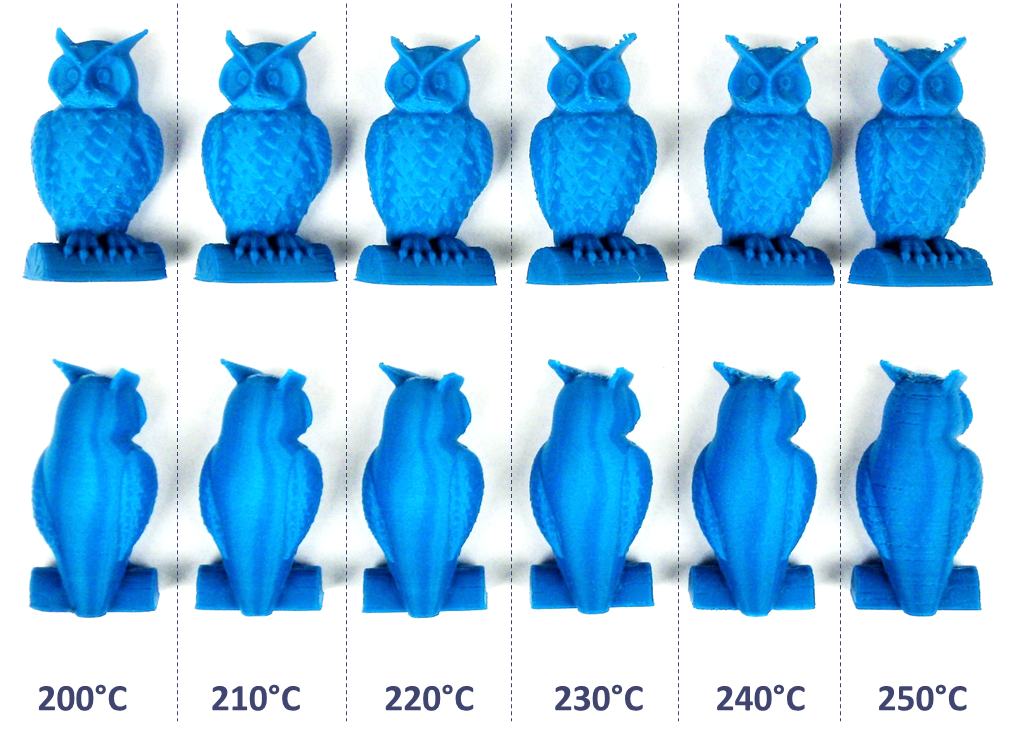
Image retrieved from: http://my3dmatter.com/what-is-the-influence-of-color-printing-speed-extrusion-temperature-and-ageing-on-my-3d-prints/
My3dmatter.com found that 220 degrees was the sweet spot for the filament they used.
Support Structures and RaftsWe've covered the basics of support structures and rafts in the process tips section. From past experience working with students who are beginners at 3D printing, projects will be misaligned or have flaws. We highly recommend that you include support structures (especially when there are overhangs) and a raft with almost all prints.
Scaling Your PrintsIn some cases, you or your students may want to print out a few prototypes or iterations of their designs. Most slicers have a scaling feature that allows you to scale the print down. This allows you to print a smaller version of the design quickly and identify any potential design or printing flaws prior to investing a large amount of time printing it full size. This feature saved us a lot of time when printing younger students' first versions of their designs.
|
As explained in our process tips section, fill density is a setting found in the slicer that specifies the amount of material used to fill solid sections of your print job. Different densities are useful for different types of projects. According to Slic3r.org, "Most models require only a low density infill, as providing more than, say, 50% will produce a very tightly packed model which uses more material than required. For this reason a common range of patterns is between 10% and 30%, however the requirements of the model will determine which density is best. Figure shows how the patterns change as the density increases."

Image retrieved from: http://manual.slic3r.org/expert-mode/infill
Infill patterns at varying densities. Left to Right: 20%,40%,60%,80%. Top to Bottom: Honeycomb, Concentric, Line, Rectilinear, Hilbert Curve, Archimedean Chords, Octagram Spiral
Print SpeedPrint speed can make or break your print job. Fine prints may need to be slowed down in order to achieve a high level of accuracy and less detailed objects can be printed at high speed to lower print times. Our favorite setting is between 30 and 50 mm/s.
My3dmatter.com states "Current 3D printing FDM technology remains fairly slow, with typical printing time counted in hours. So printing faster saves valuable time. But it also often means making a compromise on the quality of the printed object.
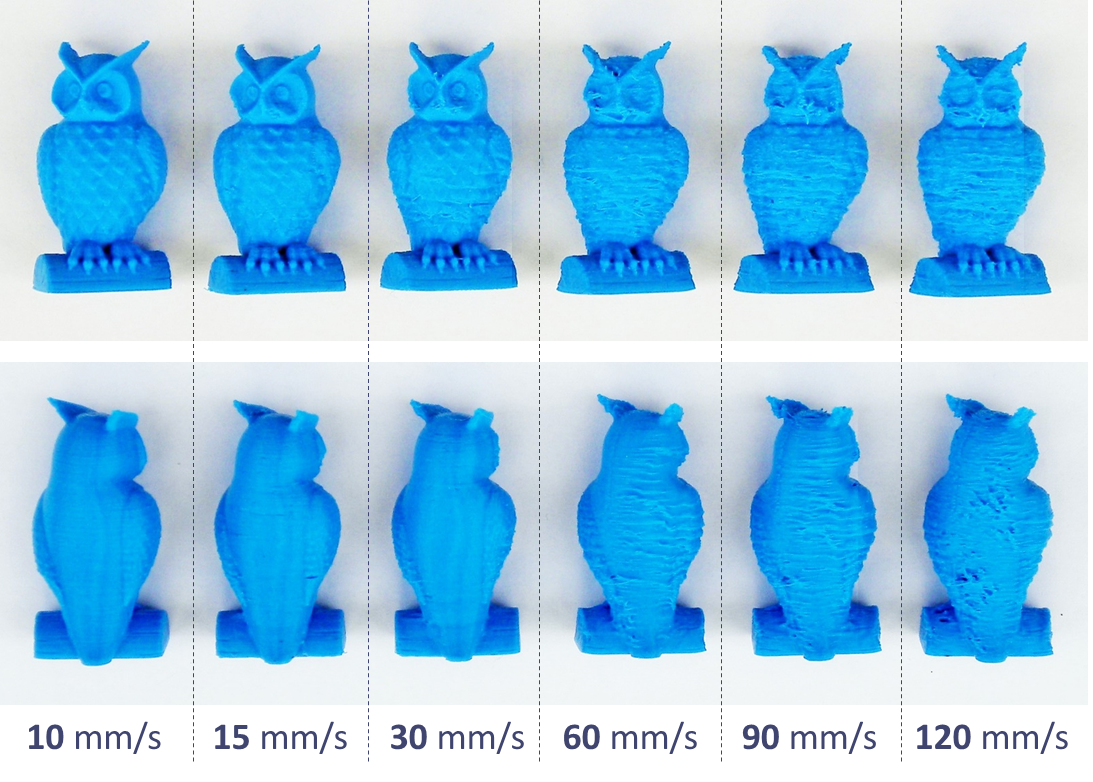
Image retrieved from: http://my3dmatter.com/what-is-the-influence-of-color-printing-speed-extrusion-temperature-and-ageing-on-my-3d-prints/
|
